September is here and so is “The Fab Furniture Flippin’ Contest”. This is by far the most challenging project I have ever done and I am very proud of the result.. It may not be 100% perfect but the time, effort and dedication that went into this project was second to none..
This month’s theme is – “GEOMETRIC DESIGN” and our lovely hosts this month are Carrie from Thirty Eight Street and Lynn from Fern Avenue.

Every month this fantastic competition is taking place thanks to some amazing bloggers and sponsors who have made this possible! This month’s sponsor is General Finishes*, they have a fantastic range of paints, top coats , stains and so much more. A huge thank you to the sponsor of this month’s competition for their generosity.
![]()
As soon as I heard that this month’s theme was geometric design I really wanted to do something that would stand out and be a bit different.. First thing that came into my head was that I actually wanted to make the shapes out of the materials myself… then came the idea – how about cutting pieces and putting them back together to create a pattern?? I had a lovely round table (hello?! round – geometric shape!) and thought I could make a pattern out of wooden pieces that I would glue together to cover the old table top .. I know crazy right?? Let’s cut something up so that it can be put back together!! But do bear with me, it will all make sense in a minute…
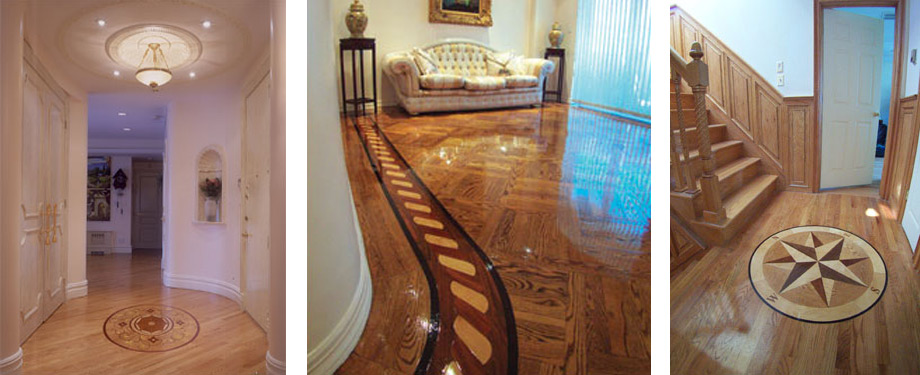
I got my initial inspiration from hardwood floor medallions as that was the exact concept I was after for the table! I decided to go with a compass as I thought it would look lovely as a table top… A bit ambitious for sure, but I knew I would give it my all and I could always rely on some help from my father-in-law if I needed it..
I used real oak flooring panels (how appropriate!) to make a table top and initially wanted use this old table as the base. As always it didn’t quite go to the plan…

As the wooden panels would slide together making a lovely plank it was perfect canvas to draw the pattern on.

When the pattern was on, the little lines looked too obvious and someone had “the great idea” to cut a few milimeters off so that the panels would match… well it was a task and a half as it took us hours, but it DOES make such a difference don’t you think? The wood was then glued together.

This made the table top slightly smaller than anticipated, so I had to scrap the original plan and instead had to make a brand new table top and re-use the wooden rim and leg from the old table. Back to square one and draw the compass on again and start cutting!!

The two circles were cut out, one of the circles was moved by 90° so the grain would go against the other circle’s grain and then glued back together.
The circles were glued on a panel cut out of some plywood. As the original table was bigger we had to cut small incisions in the rim to enable us to bend it to the correct size. It was then glued and screwed firmly to the base.

Then came the difficult part – cutting out the individual shapes. This was a 2 part process. First, as I could not use the old shapes for the actual table (as the grain was all over the place and I needed the grain to go with the individual shape), I cut them out and used them as template ONLY, marking them so I knew in which order they were going.

I then traced them on the individual flooring panels and cut them out one by one.

Some of the wooden templates worked, some didn’t so I had to improvise as I went along and used some paper templates too and carefully cut the shapes out using a jigsaw.

I spent a good few hours doing this, and had to step away a couple of times as I was getting a bit overwhelmed.. But once all pieces were individually cut I was very happy as it meant that ALL pieces were going with the grain, just the way I intended! YAY!

It was then time to put the ‘puzzle’ together..
I started by gluing 4 large arrows that would be symbolising North, East, South and West to the base so that the central pieces were put in perfectly and let it dry overnight.


I then went clockwise gluing the pieces and sanding the sides as necessary to fit them in place and glued them on using some wood glue.

When the glue was dry it was time to sand…and sand… and sand…..and SAND using a rotary sander..


To fill all the gaps I used some sawdust mixed with pva glue. It was a bit messy but is definitely worth the effort.


Slight sanding over the top once it was dry to make sure it was all level.

I really wanted the North, East, South and West to be marked by lovely letters. The letters were drawn on the top and then carved out using a dremel with diamond tip and several scalpels. Then the letters were glued in place using some wood glue and then clamped.


Then came the star of the show – Java Gel Stain by General Finishes. This would really bring the table together. I used some frog tape to get the lovely crisp lines and stained the top as I went along.


To achieve the lighter shades I used beeswax and General Finishes stain in American Oak .

As the letters were slightly damaged when they were sanded over, I decided to paint them using some metallic copper paint.

I also used the copper paint around the side of the table and once it was dry I put some Java Gel Stain around so it was not as shiny.

I sanded the table leg and then stained it using the stain in American Oak and once it was dry I went over using Java Gel Stain and wiped off to have some depth to bring that beautiful grain out. Isn’t it stunning? I then added some darker accents on the leg using the same Java Gel Stain but this time I didn’t wipe it off as I wanted it to be extra dark.

To finish off the table I used High Performance Polyurethane Water Based Top Coat in satin finish (I had to wait 72 hours before applying this because as I used oil based stains).
So what do you think?!


And of course Coco was there to strike a pose!!!


Here are the full list of hosts, head over and check out their fabulous furniture flips.
![]()
Evey’s Creations, Anastasia Vintage, Ciburbanity, Fern Avenue, Thirty Eighth Street,
If you are interested in participating in this contest going forward, please contact info@fabfurnitureflippincontest.com.
*The General Finishes product was received free of charge from General Finishes, however all ideas, opinions and experiences are 100% my own.
Updated 5 October 2015
So unfortunately I didn’t win this month’s competition, BUT I did get so much positive response and amazing comments from everyone, so I wanted to say a massive thank you.. Also I was 3 judges favourite pick and here is what THEY thought of my table…
This Compass Table by Evija of From Evija With Love is not painted people. She hand cut and put this all together like a puzzle. AMAZING details!! I am impressed for sure and I just love it. Maybe she’ll send this table to me 🙂
-Lynn, Fern Avenue–

Last but certainly not least is this compass table by Evija of From Evija With Love. Dudes, she cut the wood and MADE this thing. Like one piece of wood at a time. What? Who DOES that?! Evija. That’s who. It looks SO chic and professional, doesn’t it?
– Charlotte, Ciburbanity –

Evija from Evija with Love, CUT AND PUT TOGETHER this Compass table top, y’all…stained each section, and the result is just striking! I literally gawked at this entry and could not contain my joy over the incredible detail, and sheer talent!
– Evey, Evey’s Creations–

Thank you judges & everyone who voted and supported me! I think this table is amazing even if it didn’t win the competition! 🙂

Wow! It looks excellent! Love it x
I think you did an amazing job with this table
Thank you Andres!
Holy smokes, girl! You rocked it! 😀
Thank you Larissa! 🙂
Your table turned out gorgeous! What a labor of love! Would love it if it if you shared it this weekend on our furniture only party… Friday’s Furniture Fix. It starts Thursday night at 9pm EST Have a great rest of the week!
Thank you Lucy! Will definitely linkup!! 🙂 x
Wow! If I was voting, you would win!!
Thank you Heather, it means a lot! I love the piece you entered, it’s beautiful! 🙂 xx
Amazing…… Looks brilliant!!! Really love it!
Wow talk about talent, I bet this table would see for thousands, not that you would want to sell, you are amazing, I could never tackle a project like this. It will be great to share in the coming ww post, thanks for Co-Hosting with me this month!!
Thumbs up!!!
Have a great week!
Karren
Karren, thank you very much.. I will NEVER sell it ha ha .. Even if I have to drag it around with me, it’s going nowhere.. blood, sweat and tears went into this 🙂 My pleasure co-hosting, best wishes xxx
I was holding my breath while reading you, all this measuring and cutting and finally… WOW!! I love it Evija! You’re talented!!
Hugs,
Pili
Pili, you are so sweet.. Thank you it means the world hearing your lovely comments! Sending you a big virtual hug! Have a wonderful day 🙂 xx
I’d say you put your blood sweat and tears into this table it’s absolutely gorgeous, Evija! I love compass roses and yours is perfect! You are incredibly talented! I have something similar planned for the twin of one of my end tables! You gave me the inspiration to finish it! It’s a pleasure co-hosting with you! Have a great rest of your week! Christine
I sure did Christine! Thank you so much.. and I look forward to seeing your end table once it is done! 🙂
Wow! This is amazing! Wow again! Great work!
Thank you 🙂
OMG amazing, well done!!
Thank you Lee 🙂
Stunning! Absolutely stunning. Wow! I know you’lll be proud of this table wherever you use it! Love! XO – Wendi @H2OBungalow
Thank you Wendi x
Wowza – you knocked this one out of the park! I can’t believe each of those are separate pieces of wood. Amazing work!
Thank you Jenny 🙂
Wow. That’s fantastic. You said that it wasn’t perfect but it looks pretty d****d good to me! And love that Coco posed with it too 🙂 #makinghome
Thank you so much Stephanie, I am my worst critic! 🙂 Coco loves to take centre stage lol
Oh my goodness, that is amazing!! You totally rocked the theme girl, and in a totally gorgeous way.
Thank you so much Kim 🙂
This table is AH-MAZING! You really put in some work to make such a cool piece, bravo!
Thank you Jessica 🙂
Wow you went all out on this one Evija, what an awesome sweet geometric project, stupendous job girl! I see a case of GF coming your way for sure.
Thank you so much Brenda, it means a lot.. there are so many fab projects its a tough competition as always, but fingers crossed! 🙂 xx
Gosh this is actually amazing! You are a very talented (and very patient) lady. Great work. Thanks so much for linking up to #MakingHome
Thank you Annie 🙂 thank you for hosting!
Wow, this is quite stunning! I can only imagine how much work it was but it must make you feel so proud of the results. Show piece for sure!
Look for your fabulous Compass Table pinned to our DIY Sunday Showcase Talent Board this weekend!
Holy cow, that’s a lot of craftiness! And a lot of work, too. Great job!
When I first saw this, I thought it was just painted and thought that was amazing, then read that it was all cut out of wood and stained! Now it’s ubber amazing!
Wow, this is so beautiful, you are so talented.
Very clever and very beautiful #2usestuesday
Wowza! What an amazing creation and labor of love! Beautiful job! Thanks so much for sharing at Vintage Inspiration Party.
What a project! You did an amazing job, and I like how you show your step-by-step, including your first try that didn’t work. A lot of things don’t work for us on the first try, but persistence pays off! Good lesson and well done.
I’m at a loss for words. You did an amazing job. The time and dedication are more than evident. It’s beautiful. I saw your link at Treasure Hunt Thursday.
you are such a proooo indeed Evija..look at all the amount of love you have put into that beautiful desk..bravooo 🙂
Beautiful! Looks so good! Pinned and tweeted. We truly appreciate you taking the time to be a part of our party. Please stop by and party with us again. The party starts Monday at 7 pm and ends on Friday at 7 pm. Happy Sunday! Lou Lou Girls
I love, love, love this table!!!! I wish I could have it in my home!
Thank you Linda 🙂 x
This is amazing! I absolutely love it and can’t wait to show it to my husband.
Thank you Paula !
WOW! I don’t know what i could say that hasnt already been stated…YOU ARE AMAZING!!!
THANK YOU so much Roger!!
Great work!
I’m just wondering why you cut the pieces out. My guess is you wanted that line of space to show between each segment
Thank you .. well I cut the pieces because it was a competition and a challenge and I wanted a little jigsaw to put together as you will see the peaces have been turned so the grain goes in different directions
Can you send me the dimensions for the table compass? I want to build an 18′ rose cumpss in my backyard in papers and would figure out the dimensions from your daya.